虚拟化技术总览
虚拟化简介
虚拟化分类方式一:
- 全虚拟化(Full-virtualization):虚拟机不知道自己是虚拟机;
- 半虚拟化(Para-virtualization):虚拟机知道自己是虚拟机。
虚拟化分类方式二:
- 软件虚拟化:不借助硬件支持,通过软件完整的模拟一台虚拟机 => QEMU TCG IR。
- 硬件虚拟化:借助硬件能力辅助进行虚拟化。
虚拟化分类方式三:
- Type 1 hypervisor:直接运行在硬件上,并管理系统中所有的硬件和虚拟机资源,比如 KVM, XEN, VMware ESXi, ARCN, Microsoft Hyper-V (WSL2)。
- Type 2 hypervisor:hypervisor 会运行在一个 host OS 上,host OS 负责管理和控制系统的硬件资源(OSX Parallels, VMware Workstation, Oracle VM VirtualBox, QEMU TCG, Cloud Hypervisor, Crosvm, Firecraker (RustVMM))。
虚拟化分类方式四:
- 硬件抽象层上的虚拟化:硬件抽象层上的虚拟化是指通过虚拟硬件抽象层来实现虚拟机,为客户机操作系统呈现和物理硬件相同或相近的硬件抽象层。由于客户机操作系统所能看到的是硬件抽象层,因此,客户机操作系统的⾏为和在物理平台上没有什么区别。
- 操作系统层的虚拟化:指 OS 内核可以提供多个互相隔离的⽤户态实例。这些⽤户态实例(经常被称为容器)对于它的⽤户来说就像是⼀台真实的计算机,有⾃⼰独⽴的⽂件系统、⽹络、系统设置和库函数等。
- 库函数层上的虚拟化:OS 通常会通过应⽤级的库函数提供给应⽤程序⼀组服务,例如⽂件操作服务、时间操作服务等。这些库函数可以隐藏操作系统内部的⼀些细节,使得应⽤程序编程更为简单。不同的操作系统库函数有着不同的服务接口,例如 Linux 的服务接口是不同于 Windows 的。库函数层上的虚拟化就是通过虚拟化操作系统的应⽤级库函数的服务接口,使得应⽤程序不需要修改,就可以在不同的操作系统中⽆缝运⾏,从⽽提⾼系统间的互操作性。例如,Wine 系统是在 Linux 上模拟了 Windows 的库函数接口,使得⼀个 Windows 的应⽤程序能够在 Linux 上正常运⾏。
Intel/AMD 在虚拟化的整体设计上区别不大,因此以 Intel VMX 为例对虚拟化在硬件层面上的实现讲解:
VMX CPU 虚拟化基本原理
什么是一个物理处理器?
从某种程度上来说,物理处理器⽆⾮包括了:
- ⼀些存放数据的物理寄存器,
- 使⽤这些寄存器的指令集,
- 按照⼀段预先写好的指令流,在给定时间点使⽤给定的部分寄存器来完成某种⽬的。
那么一个虚拟的处理器也应该包含同样的内容:
- ⼀些存放数据的虚拟寄存器(往往存在内存中),
- 使⽤这些寄存器的指令集(一些指令因为是敏感指令,所以其行为需要进行虚拟化,后面 VMX 会介绍),
- 按照⼀段预先写好的指令流(guest 里的指令),如果 EIP 寄存器以及操纵 EIP 寄存器的指令都经过了正确的虚拟化,那么这段 guest 指令流就可以正确地被执行。
VMX NIs
对指令集的虚拟化:VMX Modes
KVM 所基于的硬件虚拟化技术 VMX,背后的方法论就是陷入再模拟(trap-and-emulate):
- 一些普通指令比如计算指令不需要特别对待,直接在 guest 里运行就行,也就是说这部分指令是不需要进行虚拟化的;
- 一些指令被称为敏感指令,当 Guest 执行这些敏感指令时,不会执行这条指令真正的功能,而是会陷入到 VMM 中进行处理。相当于 VMM 代 guest 执行了这部分指令,VMM 模拟完成后再返回 guest,guest 感知不到陷入和模拟的过程,只能看到指令执行后的结果;
仅仅凭借当前 x86 架构上的四个特权级别无法满足对于敏感指令的模拟。
为了在硬件维度实现上述陷入再模拟的效果,VMX 在特权级别(Ring)之外提供了另外一个维度的分类,VMX modes,包含两种模式,分别叫做 root mode 和 non-root mode:
- VMX root mode:VMM(Hypervisor) 运行在 root mode。
- VMX non-root mode:VM(Guest) 运行在 non-root mode。
VMX 提供了两条 VMX 指令:VMXON:打开 VMX modes;VMXOFF:关闭 VMX modes。
VMX modes 和 Ring 的概念是正交的,所以细化来说,因此实际上我们有以下四种模式:
- Root kernel mode (KVM 运行在这个模式)
- Root userspace mode (QEMU 以及一众 Userspace VMM 运行在这个 mode)
- Non-root kernel mode (Guest kernel mode,Guest 的 kernel space 运行在这个 mode)
- Non-root userspace mode (Guest userspace mode,Guest 的 userspace 运行在这个 mode)

从 VMX root mode 到 VMX non-root mode 之间的转换叫做 VMX transitions,有两种类型:
- VMX Entry :从 VMX root mode 到 VMX non-root mode 。即进入虚拟机。一般通过特权指令
VMLAUNCH/VMRESUME进入; - VMX Exit :从 VMX non-root mode 到 VMX root mode 。即退出虚拟机。
VMX Entry 和 VMX Exit 不是在任何 ring 的组合下都可以发生的,根本原因在于 VMLAUNCH/VMRESUME 这两条指令是特权指令,在 root mode userspace 会 raise UD 出来。
| Ring 0 -> Ring 3 | Ring 3 -> Ring 0 | |
|---|---|---|
| VMEntry | 允许,因为比如 sgdt 指令的存在,可以从 Guest userspace 直接 exit |
不允许,因为 VMLAUNCH/VMRESUME 是只能运行在 Ring 0 特权级 |
| VMExit | 不允许,因为我们不会从 Ring 3 VMEntry 进来,所以我们不会 exit 到 Ring 3 | 允许,因为 sgdt 指令的存在 |
除此之外,Ring 0 到 Ring 0 不管 entry 还是 exit 都是允许的;Ring 3 到 Ring 3 不管 entry 还是 exit 都是不允许的。
对寄存器的虚拟化:VMCS
Virtual-Machine Control Structures. 这是一片 4KB 大小的内存区域,用来保存模拟一个 vCPU 所需要的寄存器信息。VMCS 包含的下面几个区域,其实和 context switch 的逻辑是一样的:
- Guest-state area: saved on VM exits, loaded on VM entries.
- Host-state area: Processor state is loaded from the host-state area on VM exits.
- VM-execution control fields: These fields control processor behavior in VMX non-root operation. They determine in part the causes of VM exits.
- VM-exit control fields: These fields control VM exits.
- VM-entry control fields: These fields control VM entries.
- VM-exit information fields. These fields receive information on VM exits and describe the cause and the nature of VM exits. On some processors, these fields are read-only.
VMCS 里的这几个区域每一个都包含许多 fields,每一个 field 都有自己的 encoding。Every component of the VMCS is encoded by a 32-bit field that can be used by VMREAD and VMWRITE. VMCS 里的结构可以参考: https://github.com/LordNoteworthy/cpu-internals/blob/master/VMCS-Layout.pdf
为了实现 VMCS 所引入的 NI 包含:
-
VMCLEAR,VMPTRLD,VMREAD,VMWRITE
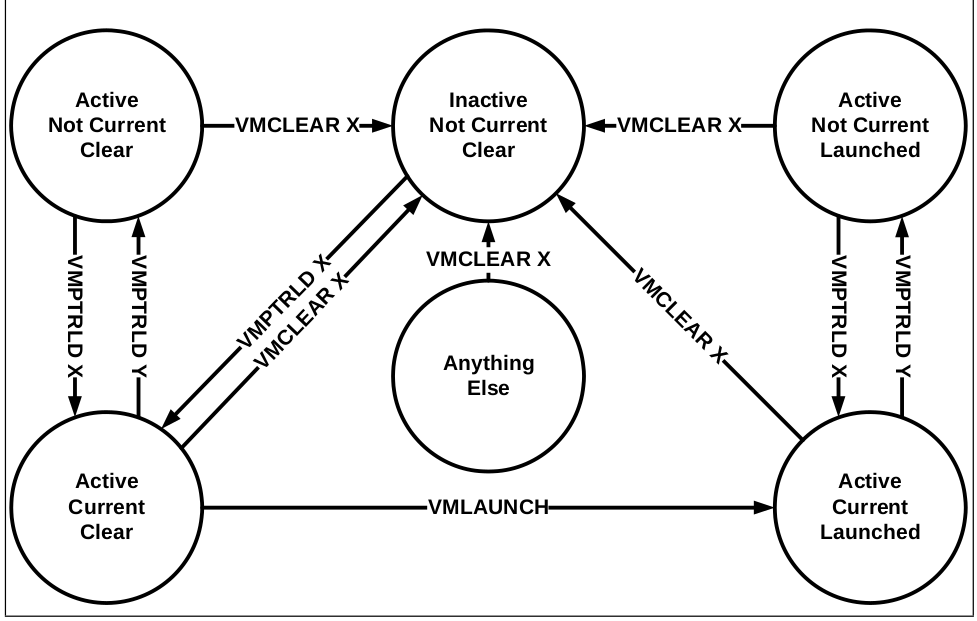
States of VMCS: Current VMCS, Active VMCS, Launched VMCS
- Active:
VMCLEAR之后,VMPTRLD之前一都是这个状态,状态被这两个指令控制; - Current: 表示如果要
VMLAUNCH,应该选择哪一个进行 launch,使用VMPTRLD/VMCLEAR来更改此状态; - Launched: 表示这个 VMCS 有没有第一次被执行过,通过指令
VMLAUNCH来更改此状态。
所有状态经过 VMCLEAR 之后都会变成 Inactive, Not Current, Clear 的状态:
- 只要运行过
VMLAUNCH,就会变成 Launched 的状态;
VMX 引入的 PV 指令 VMCALL, VMFUNC
在虚拟化的概念中,有一种 guest 可以执行的操作叫做 hypercall。hypercall 机制给了 guest 能够主动进入 VMM 的一种方式。KVM PV 中的许多操作都是基于 hypercall 的。hypercall 反映到体系结构指令上就是 VMCALL。
-
VMCALL,通过 exit 的方式调用 VMM 提供的功能; -
VMFUNC,无须 exit,直接调用硬件功能,因此性能更好;目前只有一个硬件 function 叫做 VE / EPTP-Switching 可以用来缓解云环境下的 Meltdown/Spectre 攻击。
VMX 内存虚拟化基本原理
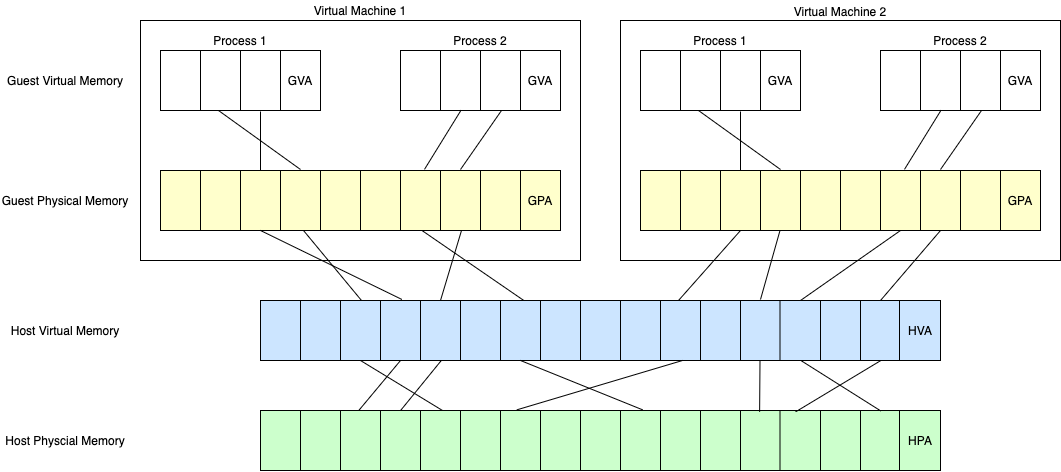
GVA, GPA, HVA, HPA
对于一片 guest 当中已映射的内存区域,有以下四个属性:
- GVA: Guest virtual address
- GPA: Guest physical address
- HVA: Host virtual address
- HPA: Host physical address
无 EPT 硬件内存虚拟化辅助之前如何做内存虚拟化?- 影子页表 (Shadow Page Table)
VMM 把 guest 和 host 中的页表合并成一个页表,称为影子页表,当 guest 运行时,影子页表替代原来的 guest 页表被 load 到 CR3 寄存器中,来实现 GVA->HPA 映射。那么有下面几个问题:
- 给定一个 GVA,如何计算出其对应的 HPA 是多少?
- 影子页表是一个 Guest 进程对应一个页表吗?
- 什么时候做影子页表合入的操作?
- 什么时候把影子页表替换真正的页表?
GVA -> HPA, 虚拟地址翻译中的实然与应然
实然:现实是如何翻译的?
- 影子页表当中记录了 GVA -> HPA 这样一条 PTE,通过这条 PTE 硬件能够准确无误地进行地址翻译与访问。
应然:GVA 翻译得到的 HPA 的值应当是多少?
-
GVA -> GPA:由 Guest 页表进行翻译; -
GPA -> HVA:由 VMM 为 guest 申请内存时所记录的内存 Address Space base + offset 的方式进行翻译; -
HVA -> HPA:由 Host 页表进行翻译。
影子页表是一个 Guest 进程对应一个页表吗?
对的, 影子页表实现非常复杂,需要为每个 Guest 中的每个进程的 Guest PT 都维护一个对应的 Shadow PT,因此影子页表整体会占用较多内存资源。
什么时候做影子页表合入的操作?
所谓合入,即将 Guest 页表、VMM 中记录的映射、Host 页表三方合入到影子页表的过程,也就是从应然变成实然的过程。
首先看一下 guest 访问 GVA 地址,翻译流程是怎样的:
- Guest writes a mapping for GVA
0xdeadbeefinto it's page tables (a location in memory), but remember, this mapping isn't being used by the hardware.(这是一条 guest 页表中 GVA -> GPA 的映射,影子页表中并没有这么一条映射); - Guest accesses
0xdeadbeef, which causes a page fault because the real page tables haven't been updated to add the mapping. - Page fault is forwarded to hypervisor.
- Hypervisor looks at guest page tables and notices they're different from shadow page tables, says "hey, I haven't created a real mapping for
0xdeadbeefyet". - So it updates its shadow page tables and creates a corresponding
0xdeadbeef->HPAmapping for the hardware to use.
什么时候对影子页表的值做替换?
每一次 Guest 发生进程切换的时候,也就是 guest 自己要切 CR3 页表的时候,都需要用到新进程的影子页表,把 CR3 的值 load 为对应进程影子页表的地址。这用到一个 VMCS 上 primary processor-based VM-execution controls 上的两个 fields:CR3-store exiting 和 CR3-load exiting。
影子页表的 Pros & Cons
优势:
- 低转换开销:由于影子页表管理的是 GVA 到 HPA 的直接映射,直接查询一层页表就可以完成地址转换,与物理机相当。
劣势:
- 高建立开销:需要监控 CR3 的修改并 exit 出来,会对性能有影响,地址转换关系的建立开销很大,为保证地址转换的合法性,所有的转换关系建立,即虚拟机进程的页表修改,都会被拦截之后陷出到特权的 VMM 中代为执行;
- 内存占用大。
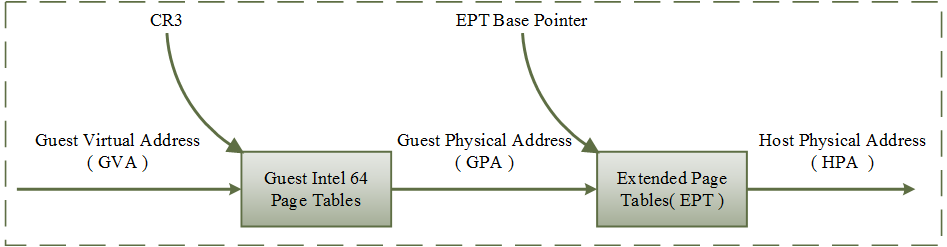
Second Level Address Translation (SLAT) & Two-Dimensional Paging (TDP) & Extended Page Table (EPT)
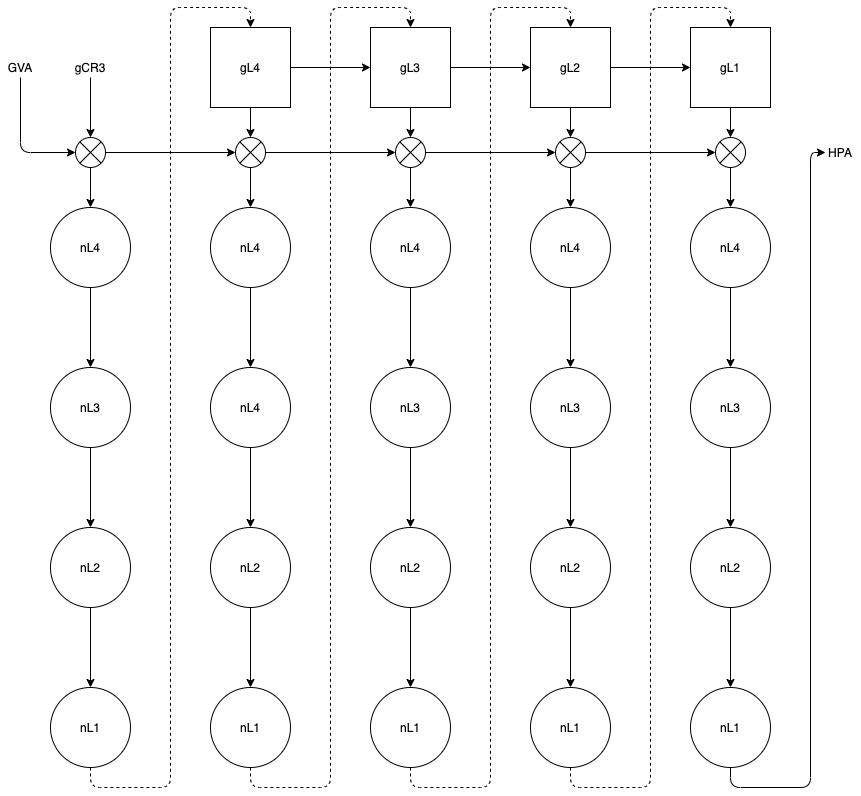
EPT 在原有 CR3 页表地址映射的基础上,引入了 EPT 页表来实现另一层映射,这样,GVA->GPA->HPA 的两次地址转换都由硬件来完成。
由于虚拟机内各级页表(gL4, gL3, gL2, gL1)内容只是 GPA,查询下一级时必须先经扩展页表(nL4, nL3, nL2, nL1)转换为 HPA,使得整个转换路径很长。在两层页表均为 4 级时,转换过程如下图所示。
好处:
- 不需要监控 guest CR3 的行为,因此降低了地址转换关系建立的开销。
坏处:
- 转换过程的开销很大,无 TLB 命中情况下最坏情况下需要 24(4 + 4 + 4 * 4)次硬件查表转换。
目前 KVM 虚拟化默认使用的是 EPT (KVM 代码中叫做 TDP, 代码框架由 Google 提出) 的方案。
KVM Overview
KVM(Kernel-based Virtual Machine)是一种实现了全虚拟化的基于 Linux 内核的 Type 1 Hypervisor,KVM 是完全基于硬件虚拟化技术的。逐一解释:
- 全虚拟化:相比于 Xen,KVM 可以不更改 guest 内核,KVM PV features/VirtIO 只是为了加速,nice to have;
- Type 1 Hypervisor:以内核模块 & device driver 的形式工作于内核模式,把 Linux 本身作为一个 hypervisor;
- 基于硬件虚拟化:如 x86 平台上的 Intel 的 VT-x (VMX) 和 AMD-V (SVM) 技术。
目前 KVM 支持的 architecture:
- x86
- ARM64
- powerpc
- risc-v
- …
支持的硬件虚拟化特性:
- Intel VT-x (VMX)
- AMD-V (SVM)
- …
kvm 内核模块编出来有两部分,一部分是 kvm.ko 一部分是 kvm-<vendor>.ko。以 Intel VT-x 为例,kvm-intel 模块是依赖于 kvm 模块的:
lsmod | grep kvm
Module                  Size  Used by
kvm_intel             339968  0
kvm                   974848  1 kvm_intel
这么实现的原因是,KVM 有很多 vendor-specific 的操作需要 vendor 自己来提供实现,比如 vmx_x86_ops 就实现了 VMX 下的所有 vendor-specific 操作,并在 kvm.ko 中使用 static_call() 调用,因此将公用的部分放入内核模块 kvm.ko 中,将 specific 的部分放在 kvm-<vendor>.ko 中进行解耦,便于管理和区分。

KVM 的设计逻辑是需要尽量对外屏蔽 arch/vendor 信息,以保证用户态程序的兼容性。因此 Userspace 使用 ioctl 下发给打开 /dev/kvm 对应的 fd,后续的 ioctl 都由 kvm.ko 处理而不是 kvm-intel.ko,必要时刻,kvm.ko 会调用 kvm-intel.ko 提供的服务。
KVM User API
KVM 以 ioctl 的形式对 userspace 提供的 API:
- System ioctls: These query and set global attributes which affect the whole kvm subsystem. In addition a system ioctl is used to create virtual machines.
- VM ioctls: These query and set attributes that affect an entire virtual machine, for example memory layout. In addition a VM ioctl is used to create virtual cpus (vcpus) and devices. VM ioctls must be issued from the same process (address space) that was used to create the VM.
- vcpu ioctls: These query and set attributes that control the operation of a single virtual cpu. vcpu ioctls should be issued from the same thread that was used to create the vcpu, except for asynchronous vcpu ioctl that are marked as such in the documentation. Otherwise, the first ioctl after switching threads could see a performance impact.
所有 KVM 提供的 API 可以在这里找到:The Definitive KVM (Kernel-based Virtual Machine) API Documentation — The Linux Kernel documentation
KVM-Hello-World:一个帮助理解如何使用 KVM 的简单项目
一个介绍如何使用 KVM 的项目:dpw/kvm-hello-world: A minimal kvm example:
cd kvm-hello-world; make run
./kvm-hello-world
Testing real mode
./kvm-hello-world -s
Testing protected mode
Hello, world!
./kvm-hello-world -p
Testing 32-bit paging
Hello, world!
./kvm-hello-world -l
Testing 64-bit mode
Hello, world!
项目目录是这样的:
|-- guest16.s
|-- guest.c
|-- guest.ld
|-- kvm-hello-world.c
|-- Makefile
|-- payload.ld
从下面 Makefile 其实可以看出来,最终需要编译出 kvm-hello-world 文件。
CFLAGS = -Wall -Wextra -Werror -O2

.PHONY: run
run: kvm-hello-world
	./kvm-hello-world
	./kvm-hello-world -s
	./kvm-hello-world -p
	./kvm-hello-world -l

kvm-hello-world: kvm-hello-world.o payload.o
	$(CC) $^ -o $@

payload.o: payload.ld guest16.o guest32.img.o guest64.img.o
	$(LD) -T $< -o $@

guest64.o: guest.c
	$(CC) $(CFLAGS) -m64 -ffreestanding -fno-pic -c -o $@ $^

guest64.img: guest64.o
	$(LD) -T guest.ld $^ -o $@

guest32.o: guest.c
	$(CC) $(CFLAGS) -m32 -ffreestanding -fno-pic -c -o $@ $^

guest32.img: guest32.o
	$(LD) -T guest.ld -m elf_i386 $^ -o $@

%.img.o: %.img
	$(LD) -b binary -r $^ -o $@

.PHONY: clean
clean:
	$(RM) kvm-hello-world kvm-hello-world.o payload.o guest16.o \
		guest32.o guest32.img guest32.img.o \
		guest64.o guest64.img guest64.img.o
The code in kvm-hello-world.c is straightforward. It:
- Opens
/dev/kvmand checks the version. - Makes a
KVM_CREATE_VMcall to creates a VM. - Uses mmap to allocate some memory for the VM.
- Makes a
KVM_CREATE_VCPUcall to creates a VCPU within the VM, and mmaps its control area. - Sets the
FLAGSandCS:IPregisters of the VCPU. - Copies a few bytes of code into the VM memory.
- Makes a
KVM_RUNcall to execute the VCPU. - Checks that the VCPU execution had the expected result.
// includes...
struct vm {
int sys_fd;
int fd;
char *mem;
};
void vm_init(struct vm *vm, size_t mem_size)
{
int api_ver;
struct kvm_userspace_memory_region memreg;
vm->sys_fd = open("/dev/kvm", O_RDWR);
//...
api_ver = ioctl(vm->sys_fd, KVM_GET_API_VERSION, 0);
//...
vm->fd = ioctl(vm->sys_fd, KVM_CREATE_VM, 0);
//...
if (ioctl(vm->fd, KVM_SET_TSS_ADDR, 0xfffbd000) < 0)
//...
// 申请这么大的内存空间给 guest 用
vm->mem = mmap(NULL, mem_size, PROT_READ | PROT_WRITE,
MAP_PRIVATE | MAP_ANONYMOUS | MAP_NORESERVE, -1, 0);
//...
madvise(vm->mem, mem_size, MADV_MERGEABLE);
memreg.slot = 0;
memreg.flags = 0;
memreg.guest_phys_addr = 0;
memreg.memory_size = mem_size;
memreg.userspace_addr = (unsigned long)vm->mem;
//...
// set memory region
ioctl(vm->fd, KVM_SET_USER_MEMORY_REGION, &memreg);
}
struct vcpu {
int fd;
struct kvm_run *kvm_run;
};
void vcpu_init(struct vm *vm, struct vcpu *vcpu)
{
int vcpu_mmap_size;
vcpu->fd = ioctl(vm->fd, KVM_CREATE_VCPU, 0);
//...
vcpu_mmap_size = ioctl(vm->sys_fd, KVM_GET_VCPU_MMAP_SIZE, 0);
//...
vcpu->kvm_run = mmap(NULL, vcpu_mmap_size, PROT_READ | PROT_WRITE, MAP_SHARED, vcpu->fd, 0);
//...
}
int run_vm(struct vm *vm, struct vcpu *vcpu, size_t sz)
{
struct kvm_regs regs;
uint64_t memval = 0;
for (;;) {
ioctl(vcpu->fd, KVM_RUN, 0);
switch (vcpu->kvm_run->exit_reason) {
case KVM_EXIT_HLT:
goto check;
case KVM_EXIT_IO:
if (vcpu->kvm_run->io.direction == KVM_EXIT_IO_OUT && vcpu->kvm_run->io.port == 0xE9) {
char *p = (char *)vcpu->kvm_run;
fwrite(p + vcpu->kvm_run->io.data_offset, vcpu->kvm_run->io.size, 1, stdout);
fflush(stdout);
continue;
}
//...
}
}
check:
ioctl(vcpu->fd, KVM_GET_REGS, ®s);
//...
memcpy(&memval, &vm->mem[0x400], sz);
//...
return 1;
}
// 后面链接进来的两个 symbol
extern const unsigned char guest64[], guest64_end[];
static void setup_64bit_code_segment(struct kvm_sregs *sregs)
{
struct kvm_segment seg = {
.base = 0,
.limit = 0xffffffff,
.selector = 1 << 3,
.present = 1,
.type = 11, /* Code: execute, read, accessed */
.dpl = 0,
.db = 0,
.s = 1, /* Code/data */
.l = 1,
.g = 1, /* 4KB granularity */
};
sregs->cs = seg;
seg.type = 3; /* Data: read/write, accessed */
seg.selector = 2 << 3;
sregs->ds = sregs->es = sregs->fs = sregs->gs = sregs->ss = seg;
}
static void setup_long_mode(struct vm *vm, struct kvm_sregs *sregs)
{
uint64_t pml4_addr = 0x2000;
uint64_t *pml4 = (void *)(vm->mem + pml4_addr);
uint64_t pdpt_addr = 0x3000;
uint64_t *pdpt = (void *)(vm->mem + pdpt_addr);
uint64_t pd_addr = 0x4000;
uint64_t *pd = (void *)(vm->mem + pd_addr);
pml4[0] = PDE64_PRESENT | PDE64_RW | PDE64_USER | pdpt_addr;
pdpt[0] = PDE64_PRESENT | PDE64_RW | PDE64_USER | pd_addr;
pd[0] = PDE64_PRESENT | PDE64_RW | PDE64_USER | PDE64_PS;
sregs->cr3 = pml4_addr;
sregs->cr4 = CR4_PAE;
sregs->cr0 = CR0_PE | CR0_MP | CR0_ET | CR0_NE | CR0_WP | CR0_AM | CR0_PG;
sregs->efer = EFER_LME | EFER_LMA;
setup_64bit_code_segment(sregs);
}
int run_long_mode(struct vm *vm, struct vcpu *vcpu)
{
struct kvm_sregs sregs;
struct kvm_regs regs;
printf("Testing 64-bit mode\n");
//...
ioctl(vcpu->fd, KVM_GET_SREGS, &sregs)
setup_long_mode(vm, &sregs);
//...
ioctl(vcpu->fd, KVM_SET_SREGS, &sregs)
memset(®s, 0, sizeof(regs));
/* Clear all FLAGS bits, except bit 1 which is always set. */
regs.rflags = 2;
regs.rip = 0;
/* Create stack at top of 2 MB page and grow down. */
regs.rsp = 2 << 20;
//...
ioctl(vcpu->fd, KVM_SET_REGS, ®s)
memcpy(vm->mem, guest64, guest64_end-guest64);
return run_vm(vm, vcpu, 8);
}
int main(int argc, char **argv)
{
struct vm vm;
struct vcpu vcpu;
//...
vm_init(&vm, 0x200000);
vcpu_init(&vm, &vcpu);
return !run_long_mode(&vm, &vcpu);
}
References:
KVM & QEMU 虚拟化栈
QEMU 有和 KVM 社区相同的社区文化,也有基于自己的 mailing list。QEMU 也是基于 rc 的方式发布的,只不过 QEMU rc0 表示 feature 合入窗口,而 Linux kernel 是 rc1。
很多 patch 都是同时发在 KVM 社区和 QEMU 社区,QEMU 现在 x86 子系统的 maintainer 之前也是 KVM 社区的 maintainer。
我们为什么需要一个 Userspace VMM?
- 易用性,灵活性考虑,比如需要根据不同的 CPU model, CPUID 对 guest CPU 进行更深度的定制;
- VirtIO device 的 backend,比如 virtio-blk, virtio-net 等等;
- 一些更应该实现在用户态的功能,比如 live migration;
- 一些 VMExit 不能完全在 root kernel space 完全地 handle,需要 exit 到 userspace 做进一步的灵活处理:
Miscellaneous
嵌套虚拟化
L0: Host, L1: Guest L2: Nested Guest.
VMCS01 and VMCS02 is on L0. VMCS12 is on L1.
The key is that (without Shadow VMCS):
- L1's
VMRESUMEwill trigger VMExit to L0; - L0 merges VMCS01 & VMCS12 to VMCS02;
- L0 runs L2 with VMCS02;
- L2 runs until VMExit (such as
VMWRITE/VMREAD) triggered because of VMCS02 (L2 VMExit will directly to L0); - L0 decides if to handle VMExit itself or reflect VMExit to L1;
With shadow VMCS:
- L1's
VMRESUMEwill trigger VMExit to L0; - L0 merges VMCS01 & VMCS12 to VMCS02;
- L0 runs L2 with VMCS02;
- L2 runs until VMExit (❌
VMWRITE/VMREAD) triggered because of VMCS02 (L2 VMExit will directly to L0); - L0 decides if to handle VMExit itself or reflect VMExit to L1;
虚拟机热迁移
- precopy:稳定性好(永远有一个可用副本)、收敛慢;
- postcopy:稳定性差(最新状态分散在 src, dst)、收敛快,需要内核开启 userfaultfd 支持。
KVM PV features
How does guest know it is running as a guest:
- Guest
CPUID; - Check CPUID leaf
0x40000000给 guest,对比 signatureKVMKVMKVM\0\0\0(也有可能是 Xen 和 ACRN)。
PV feature 发现:
- KVM 通过 CPUID 准备 PV features 列表;
- Userspace VMM Get & Set CPUID,可以选择 mask 一部分;
- Guest check CPUID leaf value。
Guest/VMM 交互:
- 基于 MSR & share memory, guest 写 MSR GPA 被 KVM 截获,比如
kvm-steal-time这个 pv feature。 - 基于
VMCALL, 比如pv-sched-yield这个 feature,exit 到 VMM 来处理。
安全虚拟机 Intel TDX

- Non-SEAM mode access TD guest memory will MCE;
- Use
SEAMCALLto add pages into TDX module.
IO 虚拟化
全虚拟化 -> virtio -> vhost -> vfio -> vdpa -> vduse (vDPA Device in Userspace)。
求物之妙,如系风捕景,能使是物了然于心者,千万人而不一遇也。