2023-05 Monthly Archive
Fuse: device not found, try 'modprobe fuse' first
Set CONFIG_FUSE_FS to y in kernel config.
Memory Overcommit
Memory Overcommit 意味着操作系统承诺给进程的内存大小,超过了实际可用内存。那么表面看起来,要保证不发生内存溢出,一个操作系统显然不应该允许 Memory Overcommit.
实际上 Linux 操作系统是允许 Memory Overcommit 的,WHY ?
避免内存浪费。因为对于 Linux 来说,只有进程真正占用内存时才会发生物理内存页的分配,申请的时候并不会引起物理内存页的分配。而进程往往申请的内存要比实际使用内存要多,例如一个进程申请了 1024 MB 的内存,可能只使用了 512 MB,那么剩下的 512 MB 根本没有发生物理内存页的分配,也就造成了浪费。
所以 Linux 操作系统允许 Memory Overcommit,只要进程申请,我就允许,这样进程们就可以比较充分地利用系统资源了,而操作系统只能寄希望于程序实际使用的没有那么多。如果不幸,进程使用的内存确实比较多,超过了操作系统真实可用的内存,Linux 就通过 OOM killer (OOM=out-of-memory) 机制选择杀死一些进程 (用户态进程,不是内核线程),以便释放内存。
Linux中的Committed_AS与CommitLimit
machine_run_board_init (QEMU)
void machine_run_board_init(MachineState *machine, const char *mem_path, Error **errp)
{
    //...
    // initialize current_machine->ram
    if (!machine->ram && machine->memdev) {
        machine->ram = machine_consume_memdev(machine, machine->memdev);
    }
    //...
}
Shared memory
Linux 中的共享内存都是通过 tmpfs 实现的。
MachineState (QEMU)
There is a global current_machine.
struct MachineState {
    //...
    // memory_region_add_subregion(get_system_memory(), 0, mch->ram);
    //   表示 ram 是 system_memory 的 subregion
    // 和 backend->mr 有什么关系呢?**是同一个东西**:
    //    machine_run_board_init
    //        machine->ram = machine_consume_memdev(machine, machine->memdev);
    //            host_memory_backend_get_memory
    //                backend->mr // 返回的是  backend->mr
    //            vmstate_register_ram_global
    //                vmstate_register_ram
    //                    qemu_ram_set_idstr(mr->ram_block, memory_region_name(mr), dev);
    //                        object_get_canonical_path_component // 名字的由来 pc.ram
    MemoryRegion *ram;
    //...
}
DSA (DATA STREAMING ACCELERATOR)
是一个硬件。
一个 CPU socket 可以支持任意多个 DSA 设备实例。
从软件角度出发,每个实体可以看做一个含有 PCIe Root Complex (RC) 根节点的终端设备 (Endpoint)。
每一个实体都在 IOMMU 的范围内。
DSA 可以只支持 SVM 操作,share virtual memory,允许设备直接访问应用程序的虚地址 (virtual address space)。DSA 同样支持 Scalable I/O virtualization (Scalable IOV, 或者 S-IOV)。同样还支持 MSI-X 和 IMS (Interrupt Message Store)。
IDXD (Intel® Data Accelerator Driver)
DSA 内核中驱动的名字叫 IDXD。
KVMState (QEMU)
Current state of the KVM accelerator.
struct KVMState
{
    int nr_slots; // KVM 支持的 memslots 的数量(通过 kvm_check_extension(s, KVM_CAP_NR_MEMSLOTS) 得到的)
    int fd;
    int vmfd;
    int nr_as; // KVM 支持的 address space 的数量(通过 kvm_check_extension(s, KVM_CAP_MULTI_ADDRESS_SPACE) 得到的)
    //...
    // dirty ring tracker...
    uint64_t kvm_dirty_ring_bytes;  // Size of the **per-vcpu** dirty ring
    uint32_t kvm_dirty_ring_size;   // Number of dirty GFNs per ring
    bool kvm_dirty_ring_with_bitmap;
    struct KVMDirtyRingReaper reaper;

};
Shutdown a fd
Causes all or part of a full-duplex connection on the socket associated with sockfd to be shut down.
- If how is SHUT_RD, further receptions will be disallowed.
- If how is SHUT_WR, further transmissions will be disallowed.
QEMU log call trace / libunwind
Install libunwind:
dnf install libunwind-devel
configure the QEMU with:
./configure --extra-cflags="-lunwind" --target-list=x86_64-softmmu --enable-kvm
Create a new file qemu/backtrace.h:
#define UNW_LOCAL_ONLY
#include <libunwind.h>
#include <stdio.h>

static inline void show_backtrace(void)
{
    unw_cursor_t cursor;
    unw_context_t uc;
    int depth = 0;
    unw_getcontext(&uc);
    unw_init_local(&cursor, &uc);
    printf("-------------------- Start trace --------------------\n");
    while (unw_step(&cursor) > 0) {
        unw_word_t offset, pc;
        char fname[64];
        int i = depth;
        unw_get_reg(&cursor, UNW_REG_IP, &pc);
        fname[0] = '\0';
        (void)unw_get_proc_name(&cursor, fname, sizeof(fname), &offset);
        while (i--)
            printf("  ");
        printf("%s+0x%lx\n", fname, offset);
        depth++;
    }
    printf("--------------------- End trace ---------------------\n");
}
Then you can include it and call the trace show_backtrace().
OSC52 over proxy
Mobaxterm doesn't support OSC52 over proxy, if you want the OSC52 still work while SSH behind a proxy, you can add following command in Windows Terminal:
ssh -X -o ServerAliveInterval=20 -C lei@10.239.48.245 -t "ssh -C -o ServerAliveInterval=20 -i /home/lei/.ssh/id_rsa lei@192.168.99.79"
It means first SSH to the first machine then the second machine. You should put your private key in the first machine for it to work (/home/lei/.ssh/id_rsa).
OSC52
OSC52 is one of these sequence and tells the terminal that the string it carries must be copied to the system clipboard (so the terminal must support it). Typically, an application encodes a string in base64, prefixes it with the OSC52 sequence and outputs it. The terminal parses the OSC sequence and updates the clipboard.
Copy text through SSH in Vim/Neovim with OSC52 | Olivier Roques
How to modify a kernel parameter?
vim /etc/default/grub
直接更改 GRUB_CMDLINE_LINUX 即可,其会作用到所有的 kernel 上。
Why GRUB_CMDLINE_LINUX? Because:
- Options in
GRUB_CMDLINE_LINUXare always effective. - Options in
GRUB_CMDLINE_LINUX_DEFAULTare effective ONLY during normal boot (NOT during recovery mode).
Then:
- On CentOS: run:
# 如果 grub 版本不对其实是没有 --update-bls-cmdline 这个参数的,
# 这种情况可以不加这个参数。可以通过 grub2-mkconfig -h 来看有没有这个参数。
grub2-mkconfig -o /boot/grub2/grub.cfg --update-bls-cmdline
cp -fr /boot/grub2/grub.cfg /boot/efi/EFI/centos/grub.cfg
- On Ubuntu: run
update-grub
QEMU config options
Unlike Linux, there is no user interface to edit the configuration, which is instead specified in per-target files under the configs/ directory of the QEMU source tree. This is because, unlike Linux, configuration and dependencies can be treated as a black box when building QEMU; the default configuration that QEMU ships with should be okay in almost all cases.
The difference between:
configs/targets/i386-softmmu.makconfigs/devices/i386-softmmu/default.mak
are
See current running kernel's config
cat /proc/config.gz | gunzip > ~/myconfig
kvm_vcpu.cpu
The physical CPU this vCPU is running on.
APIC ID
The initial APIC-ID is used to identify the executing logical processor.
From SDM: In MP systems, the local APIC ID is also used as a processor ID by the BIOS and the operating system.
x86_cpu_to_apicid() Kernel / cpuid_to_apicid
Map cpu index to physical APIC ID.
两者不相等的原因可能是,CPU 的 id 是 OS 里的概念,每 boot 起来一个 CPU,那么 CPU 的 id 就加一。但是我们并不能保证 CPU boot 的顺序和 APIC ID,也就是 CPU 的物理 ID 的顺序是相等的,所以需要有这样的一个映射。
This global variable is always used as per_cpu(x86_cpu_to_apicid, cpu) to return the corresponding apicid from cpu.
可以看看函数 allocate_logical_cpuid(),看看 CPUID 是怎么分配的。
__setup Function in kernel
__setup(String, Function_handler)
__setup just tells the kernel to execute Function_handler when the input string (kernel command line parameter) contains a string at startup.
kvm_arch_vcpu_put
VPID / INVVPID
Virtual Processor Identifiers
16 bit VPID field in VMCS.
TLB entries tagged with VPID value.
No flush of TLBs on VM entry or VM exit if VPID active.
TLB entries of different virtual machines can all co-exist in the TLB.
First generation VT-x forces flushing TLB and paging-structure caches on each VMX transition
Performance loss on all VM exits.
VPIDs introduce to VMX operation a facility by which a logical processor may cache information for multiple linear-address spaces.
VPIDs and PCIDs can be used concurrently.
INVVPID invalidates all the specified mappings for the indicated VPID(s) regardless of the EPTP and PCID values with which those mappings may be associated.
VPID is for virtualization, PCID isn't.
INVVPID — Invalidate Translations Based on VPID
PCID / INVPCID
Process-context Identifiers
There are four INVPCID types currently defined:
- Individual-address invalidation: If the INVPCID type is 0, the logical processor invalidates mappings—except global translations—for the linear address and PCID specified in the INVPCID descriptor.1 In some cases, the instruction may invalidate global translations or mappings for other linear addresses (or other PCIDs) as well.
- Single-context invalidation: If the INVPCID type is 1, the logical processor invalidates all mappings—except global translations—associated with the PCID specified in the INVPCID descriptor. In some cases, the instruction may invalidate global translations or mappings for other PCIDs as well.
- All-context invalidation, including global translations: If the INVPCID type is 2, the logical processor invalidates all mappings—including global translations—associated with any PCID.
- All-context invalidation: If the INVPCID type is 3, the logical processor invalidates all mappings—except global translations—associated with any PCID. In some case, the instruction may invalidate global translations as well.
sched_info.run_delay
This is an accumulated value, recording the total time has been spent on waiting on a runqueue.
Pte, pmd, pud, p4d
PTE is 12 bit (4K), each other level is 9bit.
So page size can be 4K (12bit), 2M (12 + 9=21bit) and 1G (12 + 9 + 9=30bit).
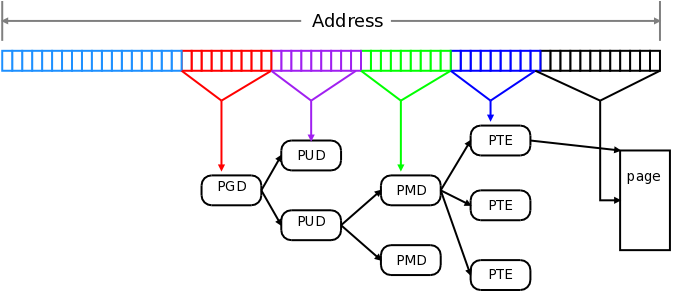
Five-level page tables [LWN.net]
pv_ops
A global variable in guest kernel.
struct paravirt_patch_template pv_ops = {
	/* Cpu ops. */
	.cpu.io_delay		= native_io_delay,
    //...
}
pvops 是做什么的? 简单地说,hook kernel。利用 pvops 你可以自定义自己的 write_cr3 函数,你可以修改页表,追踪页表更新的信息,而这些听起来非常底层的操作,利用 pvops 都变得简单起来。
pvops 接口来源于 Xen 项目,初衷是建立一个类虚拟化 (para-virtualized)内核来适应于不同的 hypervisor,当然也包括适应于非虚拟化平台。
PVOP_VCALL2
It is a macro for hypercall, with 2 params. If the function use 3 params, it should use PVOP_VCALL3.
kvm_get_preset_lpj()
lpj: loops_per_jiffy.
static void __init kvm_get_preset_lpj(void)
{
	unsigned long khz;
	u64 lpj;

	khz = kvm_get_tsc_khz();

	lpj = ((u64)khz * 1000);
	do_div(lpj, HZ);
	preset_lpj = lpj;
}
X86 CPU feature bits
决定了 cat /proc/cpuinfo 的输出 flag 名字是什么。These flags represent hardware features as well as software features.
一个 feature 并不一定和一个 CPUID 对应。比如
#define X86_FEATURE_TDX_GUEST ( 8*32+22) /* Intel Trust Domain Extensions Guest */
在 flags 里显示为 "tdx_guest"。
这些 feature 的来源有三种方式:
- CPUID,并且单个 leaf 内的 layout 是被保留的(比如 CPUID_7_0_EBX 里的 bits 顺序是没有变的)。
- 多个散落的 CPUID 组成一个 feature,
注意有两个源文件:
- arch/x86/include/asm/cpufeature.h
- arch/x86/include/asm/cpufeatures.h
// arch/x86/include/asm/cpufeature.h
enum cpuid_leafs
{
	CPUID_1_EDX		= 0,
	CPUID_8000_0001_EDX,
	CPUID_8086_0001_EDX,
	CPUID_LNX_1,
	CPUID_1_ECX,
	CPUID_C000_0001_EDX,
	CPUID_8000_0001_ECX,
	CPUID_LNX_2,
	CPUID_LNX_3,
	CPUID_7_0_EBX,
	CPUID_D_1_EAX,
	CPUID_LNX_4,
	CPUID_7_1_EAX,
	CPUID_8000_0008_EBX,
	CPUID_6_EAX,
	CPUID_8000_000A_EDX,
	CPUID_7_ECX,
	CPUID_8000_0007_EBX,
	CPUID_7_EDX,
	CPUID_8000_001F_EAX,
};
3. x86 Feature Flags — The Linux Kernel documentation
x86_platform_ops / x86_platform
x86_platform_ops and x86_platform is a 1:1 struct to global object relationship.
calibrate: 校准。
/**
 * struct x86_platform_ops - platform specific runtime functions
 * @calibrate_cpu:		calibrate CPU
 * @calibrate_tsc:		calibrate TSC, if different from CPU
 * @get_wallclock:		get time from HW clock like RTC etc.
 * @set_wallclock:		set time back to HW clock
 * @is_untracked_pat_range	exclude from PAT logic
 * @nmi_init			enable NMI on cpus
 * @save_sched_clock_state:	save state for sched_clock() on suspend
 * @restore_sched_clock_state:	restore state for sched_clock() on resume
 * @apic_post_init:		adjust apic if needed
 * @legacy:			legacy features
 * @set_legacy_features:	override legacy features. Use of this callback
 * 				is highly discouraged. You should only need
 * 				this if your hardware platform requires further
 * 				custom fine tuning far beyond what may be
 * 				possible in x86_early_init_platform_quirks() by
 * 				only using the current x86_hardware_subarch
 * 				semantics.
 * @realmode_reserve:		reserve memory for realmode trampoline
 * @realmode_init:		initialize realmode trampoline
 * @hyper:			x86 hypervisor specific runtime callbacks
 */

// calibrate_cpu/calibrate_tsc
start_kernel
    setup_arch
        tsc_early_init // can also late init
            determine_cpu_tsc_frequencies
                cpu_khz = calibrate_cpu()
                tsc_khz = calibrate_tsc()
Difference between cpu_khz and tsc_khz
Skylake CPU base-frequency and TSC frequency may differ by up to 2%.
Enumerate CPU and TSC frequencies separately, allowing cpu_khz and tsc_khz to differ.
[tip:x86/timers] x86/tsc: Enumerate SKL cpu_khz and tsc_khz via CPUID - tip-bot for Len Brown
mmu-gather
通常在进程退出或者执行 munmap 的时候,内核会按一下顺序:
- 解除相关虚拟内存区域的页表映射
- 刷相关 tlb
- 释放物理页面
绝对不能在刷 TLB 之前就释放了物理页面(映射还在,页面没了),而 mmu-gather 的作用就是保证这种顺序,并将需要释放的物理页面聚集起来统一释放。
struct mmu_gather
表示一次 mmu 积聚操作,在每次解除相关虚拟内存区域时使用。
struct mmu_gather {
	struct mm_struct	*mm; // 操作哪一个进程的虚拟内存

#ifdef CONFIG_MMU_GATHER_TABLE_FREE
	struct mmu_table_batch	*batch; // 积聚进程各级页目录的物理页
#endif

    // 操作的起始和结束虚拟地址,这两个地址在处理过程中会被相应的赋值
	unsigned long		start;
	unsigned long		end;
	/*
	 * we are in the middle of an operation to clear
	 * a full mm and can make some optimizations
	 */
	unsigned int		fullmm : 1; // 是否操作整个用户地址空间

	/*
	 * we have performed an operation which
	 * requires a complete flush of the tlb
	 */
	unsigned int		need_flush_all : 1; // 表示我们已经释放了相关的页目录

	/*
	 * we have removed page directories
	 */
	unsigned int		freed_tables : 1;

	/*
	 * Do we have pending delayed rmap removals?
	 */
	unsigned int		delayed_rmap : 1;

	/*
	 * at which levels have we cleared entries?
	 */
	unsigned int		cleared_ptes : 1;
	unsigned int		cleared_pmds : 1;
	unsigned int		cleared_puds : 1;
	unsigned int		cleared_p4ds : 1;

	/*
	 * tracks VM_EXEC | VM_HUGETLB in tlb_start_vma
	 */
	unsigned int		vma_exec : 1;
	unsigned int		vma_huge : 1;
	unsigned int		vma_pfn  : 1;

	unsigned int		batch_count;

#ifndef CONFIG_MMU_GATHER_NO_GATHER
	struct mmu_gather_batch *active;
	struct mmu_gather_batch	local;
	struct page		*__pages[MMU_GATHER_BUNDLE];

#ifdef CONFIG_MMU_GATHER_PAGE_SIZE
	unsigned int page_size;
#endif
#endif
};
struct mmu_table_batch / Struct mmu_gather_batch
// 用于积聚进程使用的各级**页目录**的物理页,在释放进程相关的页目录的物理页时使用(文章中称为**页表批次的积聚结构**)。
struct mmu_table_batch {
#ifdef CONFIG_MMU_GATHER_RCU_TABLE_FREE
	struct rcu_head		rcu;
#endif
	unsigned int		nr;
	void			*tables[];
};

// 表示普通物理页的积聚批次,用于积聚进程映射到用户空间物理页(文章中称为**批次的积聚结构**)。
struct mmu_gather_batch {
	struct mmu_gather_batch	*next;
	unsigned int		nr;
	unsigned int		max;
	struct encoded_page	*encoded_pages[];
};
Mmu-gather process
tlb_gather_mmu // mmu-gather 初始化,也就是 struct mmu_gather 的初始化
unmap_vmas // 解除相关虚拟内存区域的页表映射
free_pgtables // 释放页表
tlb_finish_mmu // 刷 tlb ,释放物理页
深入理解Linux内核之mmu-gather操作-面包板社区
Page Dirty Rate Calculation in QEMU
3 modes to calculate dirty page rate:
DIRTY_RATE_MEASURE_MODE_PAGE_SAMPLINGDIRTY_RATE_MEASURE_MODE_DIRTY_BITMAPDIRTY_RATE_MEASURE_MODE_DIRTY_RING
Min 1s and max 60s:
#define MIN_FETCH_DIRTYRATE_TIME_SEC              1
#define MAX_FETCH_DIRTYRATE_TIME_SEC              60
Page Sampling Mode
The page sampling mode can be used anytime.
The page sampling mode is the 1st mode got supported. The algorithm is based on small page hash values.
When the tracking is triggered, the hypervisor will select a few pages (with a default value of 512 pages (2MB) per GB), calculate the hash value for these pages and remember them. Then the hypervisor waits for a specific length of time and redo the hash calculation. If any of the page got a different hash value on its data stored, it means this page has changed during the period.
It has a benefit that it does not need KVM dirty tracking intervention. It means the measurement overhead can be fully transparent to the guest but only done in a single host thread.
A process using page sampling mode:
hmp_calc_dirty_rate
qmp_calc_dirty_rate
    init_dirtyrate_stat
    get_dirtyrate_thread // qemu_thread_create(&thread, "get_dirtyrate", get_dirtyrate_thread...)
        calculate_dirtyrate // This function is running during the calculation period
            // calculate_dirtyrate_dirty_bitmap() for dirty bitmap mode
            // calculate_dirtyrate_dirty_ring() for dirty ring mode
            // this for page sampling mode
            calculate_dirtyrate_sample_vm
                // record the hash info at start time
                record_ramblock_hash_info
                    for each block:
                        // save the each page's hash value of this RAMBlock to info->hash_result
                        save_ramblock_hash
                            // sample page ramdomly
                            g_rand_int_range
                            // save the sampled pages' result
                            info->hash_result[i] = get_ramblock_vfn_hash()
                // wait period of time
                dirty_stat_wait
                compare_page_hash_info
                    for each block:
                        // compare hash of each page in the block, count the nr (not rate)
                        calc_page_dirty_rate
                        // update the global metrics based on block metrics
                        update_dirtyrate_stat
                // calculate dirty rate based on the metrics
                update_dirtyrate
DirtyRateConfig
Config user specified.
struct DirtyRateConfig {
    uint64_t sample_pages_per_gigabytes; /* sample pages per GB */
    int64_t sample_period_seconds; /* time duration between two sampling */
    DirtyRateMeasureMode mode; /* mode of dirtyrate measurement */
};
DirtyRateStat
The stats for reporting to user finally.
There is a global variable:
static struct DirtyRateStat DirtyStat;
struct DirtyRateStat {
    // 记录的是 lm 结束之后的 dirty_rate,过程中此值为 0
    int64_t dirty_rate; /* dirty rate in MB/s */
    int64_t start_time; /* calculation start time in units of second */
    int64_t calc_time; /* time duration of two sampling in units of second */
    uint64_t sample_pages; /* sample pages per GB */
    union {
        // When page sampling is used
        SampleVMStat page_sampling;
        // When dirty ring is used
        VcpuStat dirty_ring;
    };
};
SampleVMStat
typedef struct SampleVMStat {
    uint64_t total_dirty_samples; /* total dirty sampled page */
    uint64_t total_sample_count; /* total sampled pages */
    uint64_t total_block_mem_MB; /* size of total sampled pages in MB */
} SampleVMStat;
DirtyRateStatus
typedef enum DirtyRateStatus {
    DIRTY_RATE_STATUS_UNSTARTED,
    DIRTY_RATE_STATUS_MEASURING,
    DIRTY_RATE_STATUS_MEASURED,
    DIRTY_RATE_STATUS__MAX,
} DirtyRateStatus;
RamblockDirtyInfo
struct RamblockDirtyInfo {
    char idstr[RAMBLOCK_INFO_MAX_LEN]; /* idstr for each ramblock */
    uint8_t *ramblock_addr; /* base address of ramblock we measure */
    uint64_t ramblock_pages; /* ramblock size in TARGET_PAGE_SIZE */
    uint64_t *sample_page_vfn; /* relative offset address for sampled page */
    uint64_t sample_pages_count; /* 通过 RB 的大小以及每 GB 要 sample 的 page 数量得出 */
    uint64_t sample_dirty_count; /* 这个 RB 当中 dirty page 的数量(通过对比 hash 得到) */
    uint32_t *hash_result; /* array of hash result for sampled pages */
};
DirtyRateInfo
Migration status at that time.
struct DirtyRateInfo {
    // 为真时 info dirty-rate 才会输出 log
    // 即使 dirty rate 的值是 0。
    bool has_dirty_rate;
    int64_t dirty_rate;
    DirtyRateStatus status;
    int64_t start_time;
    int64_t calc_time;
    uint64_t sample_pages;
    DirtyRateMeasureMode mode;
    bool has_vcpu_dirty_rate;
    DirtyRateVcpuList *vcpu_dirty_rate;
};
query_dirty_rate_info
hmp_info_dirty_rate
query_dirty_rate_info
static struct DirtyRateInfo *query_dirty_rate_info(void)
{
    int i;
    int64_t dirty_rate = DirtyStat.dirty_rate;
    struct DirtyRateInfo *info = g_new0(DirtyRateInfo, 1);
    DirtyRateVcpuList *head = NULL, **tail = &head;

    // 把除了最关键的信息 “dirty rate” 以外的其它信息赋予 info
    info->status = CalculatingState;
    info->start_time = DirtyStat.start_time;
    info->calc_time = DirtyStat.calc_time;
    info->sample_pages = DirtyStat.sample_pages;
    info->mode = dirtyrate_mode;

    if (qatomic_read(&CalculatingState) == DIRTY_RATE_STATUS_MEASURED) {
        info->has_dirty_rate = true;
        // 如果时间结束,那么才将 dirty_rate 赋予
        info->dirty_rate = dirty_rate;
        // dirty bitmap and dirty ring specific handling
        //...
    }

    return info;
}
内核抢占模型
- No Forced Preemption
- Preemptible Kernel
- Voluntary Kernel Preemption
- Full Real Time Preemption
什么是内核抢占?
支持内核抢占意味着当一个进程在内核里运行时,另一个进程可以抢占第一个进程并被允许运行,即使第一个进程尚未完成其在内核里的工作。
No Forced Preemption (CONFIG_PREEMPT_NONE)
This is the default one.
不代表不开启内核抢占,而是通过在内核态主动让出 CPU 来抢占(内核中的 sleep(), schedule(), yield() API 等等)。
This is the traditional Linux preemption model, geared towards throughput. It will still provide good latencies most of the time, but there are no guarantees and occasional longer delays are possible.
Voluntary Kernel Preemption (CONFIG_PREEMPT_VOLUNTARY)
This option reduces the latency of the kernel by adding more "explicit preemption points" to the kernel code. These new preemption points have been selected to reduce the maximum latency of rescheduling, providing faster application reactions, at the cost of slightly lower throughput.
This allows reaction to interactive events by allowing a low priority process to voluntarily preempt itself even if it is in kernel mode executing a system call. This allows applications to run more 'smoothly' even when the system is under load.
Preemptible Kernel (CONFIG_PREEMPT)
This option reduces the latency of the kernel by making all kernel code (that is not executing in a critical section) preemptible. This allows reaction to interactive events by permitting a low priority process to be preempted involuntarily even if it is in kernel mode executing a system call and would otherwise not be about to reach a natural preemption point. This allows applications to run more 'smoothly' even when the system is under load, at the cost of slightly lower throughput and a slight runtime overhead to kernel code.
This documentation really helps:
https://www.kernel.org/doc/Documentation/kernel-hacking/hacking.rst
网卡没有 ip
nmcli device, it may show it is disconnected, then nmcli connection up <device_name>.
并且配置开机自启动:nmcli conn mod <conn_name> connection.autoconnect yes。
nmcli 的配置文件:/etc/NetworkManager/system-connections。
Error: unknown connection
The reason is that the connection of the interface (profile) was deleted.
We need to recreate the connection (profile).
nmcli connection add con-name <name_as_your_will> ifname <device_name> type ethernet
Error: connection activation failed: No suitable device found for this connection
可能是没有插网线。
Cpumask
// A bitmap with the len equals to the nr of cpus
typedef struct cpumask { DECLARE_BITMAP(bits, NR_CPUS); } cpumask_t;
this_cpu_cpumask_var_ptr() KVM
#ifdef CONFIG_CPUMASK_OFFSTACK
#define this_cpu_cpumask_var_ptr(x)	this_cpu_read(x)
#else
#define this_cpu_cpumask_var_ptr(x) this_cpu_ptr(x)
__pv_cpu_mask Guest Kernel
// arch/x86/kernel/kvm.c
static DEFINE_PER_CPU(cpumask_var_t, __pv_cpu_mask);
可以看到一个 vCPU 一个此结构体,看来可能是因为 PV 的情况用到 cpumask 比较多,所以先预分配一个,是为了方便 guest 使用。
Usercases:
struct cpumask *mask = kzalloc(cpumask_size(), GFP_KERNEL);
How does free determine used memory?
free gathers information from /proc/meminfo.
free displays the total amount of free and used physical and swap memory in the system. 如何判断是 used 的呢,我认为如果建立了从 VA 到 PA 的映射就算是。
Why free column is smaller than available?
Free memory represents unused memory, while available memory includes caches and buffers that can be utilized without swapping(也就是可以 drop 掉的 cache 比如 page cache), making it a more.
和 used 对应的是 available,这两者加起来应该可以等于 total,used 和 free 并不完全对应。
buff/cache / Drop page cache
一般来说(我们自己没有魔改 kernel code 的话),buff/cache 不会影响到 used 和 available 列。
但是如果是 pinned buff/cache,可能就会了?
# To free pagecache:
# 注意这个只是会 drop 掉所有 clean 的 page cache,但是不会执行把 page cache 刷回盘的动作,如果需要的话需要先 sync 一下。
# sync 是一个 syscall
echo 1 > /proc/sys/vm/drop_caches
# To free dentries and inodes
echo 2 > /proc/sys/vm/drop_caches
# To free pagecache, dentries and inodes:
echo 3 > /proc/sys/vm/drop_caches
直接 echo 只能清空 page cache 中 "clean" 的部分,也就是已经和外部磁盘同步过的部分。因为 "clean" 的部分回收起来最简单,既然已经同步过了,直接丢弃即可,下次要用再从磁盘上拷贝回来就可以了,而 "dirty" 的部分需要先 writeback 到磁盘,才能释放。所以,"drop cache" 准确地应该叫 drop clean cache(如果想释放 "dirty" 的 page cache,可以先使用 "sync" 命令强制同步一下)。
/proc/sys/vm/drop_caches 清理缓存 - Hello-World3 - 博客园
drop_caches_sysctl_handler
    // call function drop_pagecache_sb() for all active superblocks
    iterate_supers(drop_pagecache_sb, NULL);
        // 对于这个文件系统的所有 inodes
        list_for_each_entry(inode, &sb->s_inodes, i_sb_list)
            // i_mapping 指向了每一个 inode 自己的 page cache
            invalidate_mapping_pages(inode->i_mapping, 0, -1);
                mapping_try_invalidate
                    mapping_evict_folio
Why doesn't mmap increase the used memory in free -m?
mmap just declare this part of virtual memory address space of this process is occupied.
It is just declared, not mapped, if read if will #PF since it is not mapped and do the allocation.
一般情况下用户进程调用 mmap() 时,只是在进程空间内新增了一块相应大小的缓冲区,并设置了相应的访问标识,但并没有建立进程空间到物理页面的映射。因此,第一次访问该空间时,会引发一个缺页异常。
- 对于共享内存映射情况,缺页异常处理程序首先在 swap cache^ 中寻找目标页,
- 如果找到,则直接返回地址;
- 如果没有找到,则判断该页是否在 swap 文件,如果在,则执行一个换入操作; 如果上述两种情况都不满足,处理程序将分配新的物理页面,并把它插入到 page cache^ 中。进程最终将更新进程页表。
- 对于映射普通文件情况(非共享映射),缺页异常处理程序首先会在 page cache 中寻找目标页(因为是普通文件而不是 swap 文件,所以肯定不会在 swap cache 中)。如果没有找到,则说明文件数据还没有读入内存,处理程序会从磁盘读入相应的页面,并返回相应地址,同时,进程页表也会更新。
linux内核中的address_space 结构解析_linux kernel address_space_operations readahead-CSDN博客
求物之妙,如系风捕景,能使是物了然于心者,千万人而不一遇也。